I'm Janimal, happily gainfully employed Momma to a sweet girl. Livin' it up in Atlanta with a great husband and a good job. Sometimes I make stuff and here's my spot to show it off! Life is good, so I'm sharing....

Monday, July 26, 2010

Delilah the Runaway CutiePie


My husband took my camera with him on a trip - so no pics of new projects. But I do have this little beauty to share with you from last week.


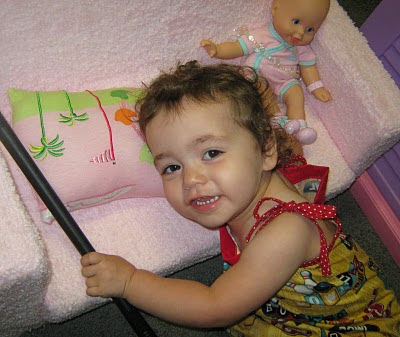
Delilah looks ready to run away from home with her sad face, pillow, and golf club. She's dressed to roll in a Popover Dress (Pattern by Oliver and S) made by her Mommy in fabric Vintage by Dan Morris from Sports Club for Robert Kaufman (purchased from Whipstitch Etsy Shop).

Don't worry, she cheered up and decided to stick around. For now.

.....and I just noticed the sticker from the paint department at Home Depot. Really completes the look don't you think?!


((The Popover Dress pattern is free and easy to follow, my tutorial to go along with this great easy pattern is here. It's a great pattern for novices, and skilled sewers would go through it in a flash!)


Later skaters,

Janimal

Wednesday, July 21, 2010

A Yo Gabba Gabba Bag

Do you love Yo Gabba Gabba like Delilah loves Yo Gabba Gabba?!

Her crazy parents (us) have front row tickets to see Yo Gabba Gabba Live! when they come to Atlanta. We are excited!

We have to carry a lot of stuff with a toddler in tow, so I created us a special bag to take down to the show. May I present.....Delilah's DJ Lance BoomBox Bag!


Looks like Muno and Foofa managed to worm themself into the front pocket of the bag. For those of you not familiar with the show, a DJ named Lance has a big magic boombox. And in the boombox live odd little creatures. The boombox is opened and the characters play and dance.


Here is a pic of DJ Lance and the "real" boombox from the show:


This bag is based on the tote tutorial posted here on Sew Mama Sew. I made this bag a little bit wider than the tutorial to make it more boombox shaped. (This tutorial rocks. I have made so many of these bags)

I love this bag! The satin is shimmery and the bag is roomy. The colored pieces are felt that I lightly glued on then topstitched around each piece. Moms know, we have to bring a bag with us wherever we go with our kids anyway, so why not a fun bag that relates to the show! When I showed Delilah the bag she pointed to it and yelled "Yo Gabba!" which made me feel lovely.


Our plan is for my husband to dress up like DJ Lance for the show! Yep - seriously. Is he a great Daddy or what? I'm thinking about what I want to make for Delilah and I to wear. So far I think I will make her a dress modeled after the robot character on the show, but I'm not sure yet. There will be a photo op with the characters and I am ALL about the great photo op! It's a rare thing to get front row tickets to anything, so we are throwing ourselves all in for the experience. Costumes, photos, fun!

Still working on bringing you some new items and tuturials - two more ugly knit entries coming up. One I think is pretty cool and I am proud of - the other, well, I took an ugly sweater and made an ugly hat from it. Ah well.

Later skaters,

- Janimal


Show and Tell GreenPonyTails and FishScales


Visit thecsiproject.com

Tuesday, July 20, 2010

Toddler Pillow from Ugly Toddler Stained Shirt


Over at Little Blue Boo, there is a contest for making a child's item out of an ugly knit. I LOVE this challenge. I am SO excited about seeing what other people do (no doubt there will be more projects on my list inspired by other entries.)


So far I have three entries. Here is my first super simple toddler pillow from a stained hand-me-down TShirt!

First, the before shot of the shirt.


Not exactly "ugly" but that's because you can't see the stain at the neckline. While it's pretty cool my point and shoot camera helps camouflage stuff like that in pictures, it's hard for me to show details to you friendly blogreader folks. So you have to trust me - there is some ugly stuff on this shirt! It's also too big for Delilah and by the time it does fit her, it'll be the wrong season to wear a Summery T with a peekaboo cutout on the back.

Here is the pillow AFTER shot. Chillin on the toddler sofa with baby.


What helped make this project so simple, is that the original shirt already had a cute design on it. Complete with a fun design, cute little gem embellishments and embroidery. If it had been a plainer shirt, it would have been fun to add some little touches but the design required no further work. Perhaps next time!

From looking, many of you can probably figure out how I did this. But I know when you try something for the first time, it can still be tricky even for something simple like this. I made a mistake as I made this! Yep - such a simple little project and I still messed up. So in this tutorial I show you my mess up and my simple fix.

First, I drew a straight line with a fabric marker across the shirt. And....this was a mistake. What I SHOULD have done was turn the garment inside out first. Ah well, it is a mistake I was able to correct.


I used the drawn line as my guide and sewed right on top of it. The plan here is that this will be the top seam of the pillow. I'll sew the bottom, leaving an opening for turning, along the bottom finished edge of the shirt.


Then I cut about 3/8' away from the stitched line.


I then realized my boo-boo. I should have drawn the line and sewed the seam with the shirt inside out.

So what to do? I turned the shirt inside out, and sewed a new seam about a half inch away, encasing the old seam. This was an accidental french seam!


Then I sewed the bottom of the shirt a few inches on each side, leaving about a 2 inch gap for turning. I sewed right along an existing stitch line.


Then turned it!


After turning, it was time to stuff with polyfil. I tend to overstuff things - but this time I was after a nice soft pillow, so tried to be careful.


The only thing left to do was whipstitch the bottom gap closed. Because I used the bottom of the shirt for the gap, and had stitched along the existing stitch line, I had a perfect line to follow when pinching the pillow closed.


Given the very simple nature of this toddler pillow project, I don't anticipate winning a prize. I have so much faith in the vast creativity of other bloggers who will enter, that I know the winner will just blow us all away! For me, entering the contest isn't as much about winning, as it is the idea of it and the challenge to enter makes me think of doing new things. A week ago I saw this too big stained shirt and thought "oh, that was a cute shirt, too bad Delilah won't be wearing it" - but this week I looked at it and thought "OH, cool contest entry!" - and am so pleased with the result.


Delilah seemed to enjoy a little pretend night night on the pillow.


I have another ugly knit project to show you, where I have taken what might get the prize for the ugliest before pic of a weird sweater. It is now a superduper ugly hat!

The third project I am pretty proud of. I got to use fabric paint, heat n bond, andmy sewing machine to make a rad skirt for my Delilah. I'll show that off when I have a little more time to put it together AND to make sure I get pictures of Delilah wearing it.


If you see a contest online - don't think about winning. Don't think about comparing yourself to the crafty superwomen with mad skillz and their fabulous projects and professional photography. Think about how you are challenging yourself. Think about the cool inspiration you have to create something you might not have otherwise. Enjoy!


And keep in mind, should you enter, I am entering a hideous sweater turned hat that so far my 21 month year old daughter refuses to wear. I can't blame her - it's still really ugly!

Later skaters,

Janimal


Show and Tell Green


.

PonyTails and FishScales

Wednesday, July 14, 2010

SewnCards

I just tried something new! Sewing on paper to make greeting cards!

I've seen this done on lots of blogs, and figured it was time to give it a go. Our niece is away at camp and we like to send her fun cards while she is there. Seemed like the perfect time to give card sewing a go.

Here are my first 3 attempts!


These weren't complicated to make. I took pictures to make a sort of tutorial but really if you have a sewing machine and some paper you could probably figure this out!

I started out with a piece of cardstock scrapbook paper. If I had premade cards, I would have used those but this is what I had on hand.


I folded it in half.


Then cut it in half, to make two cards.


Then I chose some coordinating fabrics for the front of the card. To make this personal for our niece, I embroidered her name on one of the fabric pieces first. If I hadn't done that, I probably would have chosen more fabric pieces to get more contrast and color on the card.


I used a glue stick to lightly tack the fabric to the card. This is certainly not a necessary step but it helped me with placing the three fabric pieces where I wanted them.


First I ran just a straight stitch around the card.


Then decided to haphazaradly sew a zig-zag stitch too.


I cleaned up the edges a bit with my scissors and the card is ready for mailing to camp!

That was fun, so I decided to make a few more cards. I had some groovy cars embroidered on some muslin waiting to be turned into something. I placed one on the other card I had cut, trimmed the fabric to fit on the card, then stitched it on using a contrasting thread and a zig zag stitch.


Here's a little closer look at the stitch.


Ooh, I liked it! So I made another one! (I snipped those loose threads AFTER taking the picture)

I am SO please with how these turned out. Now I have to figure out who to send them to. I think it might be nice to send these to my brothers. They're the kind of guys who would appreciate the little art of these cards.

Unfortunately, card #3 didn't turn out so well. I was excited about it. Decided to use some silver thread and more stitches for some extra pizzazz. But in my excitement, sewed through BOTH sides of the card. Silly Janimal!

I will definitely be sewing up more cards. I can see this being an addictive project and a wonderful way for me to show off some of the fabrics I love and use my embroidery machine. You can probably count on seeing more cards like these on this blog in the future! And if I know you in real life - you may get one!

Thanks for stopping by and happy creating!

- Janimal


Make it Yours @ My Backyard Eden


Life in the Pitts

PonyTails and FishScales
Visit thecsiproject.com

Wednesday, July 7, 2010

Felt Food Breakfast Tutorial

Good morning! It's time for a felt breakfast!

My darling husband put together Delilah's new play kitchen over the holiday weekend. To go with it, I made a few pieces of felt food to play with. I decided to sew up the most important meal of the day....breakfast!

Eggs and Sausage!


Delilah had some fun playing with them.

As she fried up the eggs, she examined the sausages. Celebrities who read my blog take note, the sausages can provide good cover against getting your picture taken!


And in this next picture, the sausages have disappeared.


That's because they are on the floor. Delilah picked them up, said "Doody" and threw them on the floor. She has a point, they do look a little like turds. But then again, don't real sausages look sort of turdlike?

(You had to figure a blog prominently featuring a toddler would have some talk of turds eventually. I'll try to keep that to a minimum.)


I took a few pictures as I sewed these up to show you how they were made.

Start off with a piece of white felt, and a yellow felt circle. Note that the white felt is not cut into an egg shape yet. We'll do that later. Later we'll need another piece of white felt about the same size. (I use wool felt rather than craft acrylic felt. It's softer, easier to sew with, and lasts longer.)


Start to sew the yolk piece onto the white felt piece. After a few stitches, turn the yolk piece into itself a bit so the yolk sticks up a bit from the felt, rather than just sewn down flat. This is hard to describe, so I hope these pictures help. The picture on the left is the yolk flat on the white, with the needle flat next to it. The picture on the right - the needle has not moved. But do you see that the yellow yolk has been moved slightly inward and there is more space between the needle and yolk? Gradually pulling the yolk in like that every few stitches will give the yolk some poufiness so we can stuff it in a bit.

After sewing the yolk about three quarters around, it's time to stuff it with some polyfil.
Stitch the yolk closed, and lay the finished piece on top of another piece of white felt. It's now time to cut our egg shape through both layers of felt.
Put some pins in the felt before cutting, to hold the two pieces of felt together. I just randomly cut around. Fried eggs have lots of weird shapes!


Then sew the two pieces of felt together using a small whipstitch. (There are lots of tutorials on sewing a whipstitch, I like this one.)


I don't know about you, but for me, one egg just isn't enough.

Now for the doody, er, I mean sausage.
First, I cut out a piece of brown felt in this shape.
Basically two long ovals the same size. Mine are about an inch and a quarter wide and just under 4 inches long. Fold them over and use the whipstitch again to start closing them up.


About halfway around the sausage, I stuff one end. Keep sewing, and stuff a bit more as a go before closing it all the way up.


All that's left is to cook them!


I hope you enjoyed this little tutorial. Thanks for stopping by and happy sewing!
- Janimal


Show and Tell Green


Visit thecsiproject.com
Newer Posts Older Posts Home